If you’ve never taken fall protection training before, you’re probably wondering what exactly happens in that class. Is it just a bunch of rules?
Do they make you wear the harness? Do you have to take a test? And most importantly — will it actually help you stay safe on the job?
Fall protection training can feel like a mystery from the outside, but once you understand what’s included, everything makes a lot more sense.
This type of training is meant to be practical, hands-on, and packed with information you’ll actually use at work. It’s not there to overwhelm you — it’s designed to keep you alive.
So let’s break down what fall protection training really consists of and what you can expect the moment you walk in.
| Training Component | What It Covers | Why It Matters |
|---|---|---|
| Fall Hazard Identification | Spotting open edges, roofs, ladders, scaffolds, skylights, unstable surfaces | You can’t protect yourself from hazards you don’t recognize |
| OSHA Requirements | Trigger heights, tie-off rules, Subpart M (construction), 1910 (general industry) | Helps workers know when fall protection is legally required |
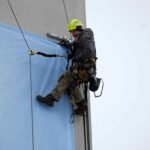
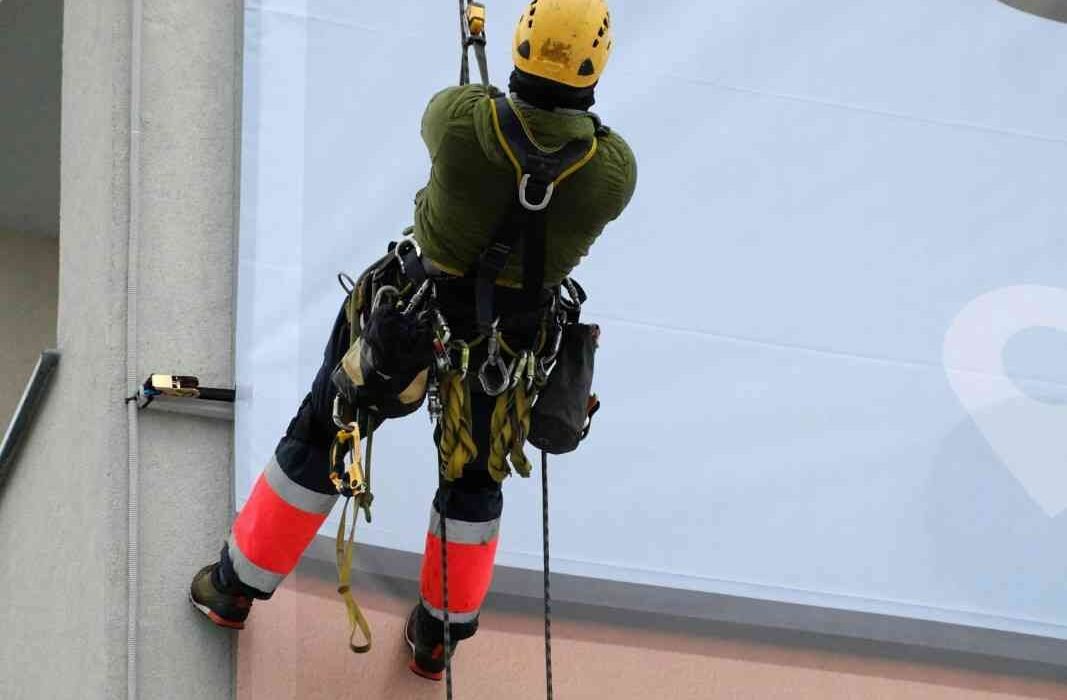
| Full-Body Harness Training | Donning, adjusting straps, chest strap position, D-ring placement | A properly fitted harness prevents severe injury during a fall |
| Lanyards & SRLs | Shock-absorbing lanyards, fixed-length lanyards, SRLs, proper use and connection | Ensures workers choose the right device for the job |
| Anchor Points | How to select safe anchors, load ratings, what NOT to anchor to | Prevents anchoring to weak or unsafe structures |
| Connectors & Hardware | Snap hooks, carabiners, locking mechanisms, proper orientation | Avoids connection failures due to improper hardware use |
| Pre-Use Equipment Inspection | Checking webbing, stitching, corrosion, labels, buckles, hardware | Detects damaged or unsafe gear before it fails |
| Fall Clearance & Distance | Total fall distance calculation, swing fall hazards, lower-level clearance | Ensures workers won’t strike a lower level in a fall |
| Hands-On Practice | Wearing a harness, tying off, ladder safety, roof edge awareness, using SRLs | Builds confidence and makes skills automatic in real work situations |
| Rescue & Emergency Response | Suspension trauma, rescue plans, basic rescue methods | Fall protection is incomplete without a plan to rescue a suspended worker |
| Worker Responsibilities | Inspecting gear, tying off, following rules, reporting hazards | Reinforces safe habits and accountability |
| Employer Responsibilities | Providing gear, training, supervision, enforcement, rescue plan | Defines what the company must do under OSHA |
| Written Test | Multiple-choice questions about hazards, equipment, rules | Ensures knowledge was understood, not just heard |
| Practical Evaluation | Demonstrating proper harness use, anchor selection, safe tie-off | Verifies that workers can apply training on the job |
| Certification & Recordkeeping | Certificate issuance, validity, refresher training requirements | Provides documentation required for compliance and audits |
Read related article: Fall protection Training Hours: Does It Take 1 Hour or 1 Day?
It Starts With Spotting the Real Fall Hazards
Most training begins with something surprisingly simple: teaching you how to see fall hazards that most people walk right past every day.
And this part is always eye-opening.
When you’re around ladders, scaffolds, roofs, open edges, or any elevated platform, your brain gets used to the environment. After a while, you stop noticing the risks. During fall protection training, someone finally says:
“Let’s slow down and look at what’s actually dangerous here.”
You’ll discuss hazards like:
- Unprotected edges
- Fragile roofs and skylights
- Slippery surfaces
- Ladders set up incorrectly
- Misused scaffolding
- Aerial lifts with no proper tie-off
- Open pits or holes on working surfaces
The goal here is simple: you can’t protect yourself from hazards you don’t recognize.
This first section is the foundation for everything else.
Read related article: Fall Protection Training Documentation: What You Need to Keep
Understanding OSHA Rules Without Getting Lost in Technical Terms
Next, fall protection training introduces the OSHA standards — but in a way that makes sense to normal human beings, not lawyers.
You’ll learn about:
- OSHA 1926 Subpart M (construction fall protection)
- OSHA 1910 (general industry)
- Trigger heights, such as:
- 4 ft (general industry)
- 6 ft (construction)
- 10 ft (scaffolding)
- and other situations like aerial lifts and ladders
Most people expect this part to be boring, but it’s surprisingly practical. Instead of memorizing codes, you’ll learn when you’re required to tie off and what your employer must provide to keep you safe.
For example:
Working on a roof edge more than 6 feet high? You need fall protection.
Operating an aerial lift? Tie-off is required — always.
Once you learn these rules in plain language, they suddenly become much easier to follow on the job.
Read related article: 7 Types of Fall Protection Training You Can Take
Getting Hands-On With the Gear: Harness, Lanyards, Anchors, SRLs
This is the part everyone remembers — because you’re not just sitting and listening anymore. You’re actually using the equipment.
Full-Body Harness: Learning to Wear It the Right Way
Most workers don’t realize how much of a difference a properly fitted harness makes.
You’ll learn:
- How to put it on step-by-step
- What the straps should feel like
- Why the chest strap must sit at mid-chest (not on your stomach)
- Why loose leg straps are extremely dangerous
- Where the D-ring should be placed
At first, almost everyone adjusts the harness too loose. During training, you quickly learn why that’s risky — and how a properly fitted harness should feel.
Read related article: Is OSHA 30 Fall Protection Training? (Why Many Get It Wrong)
Lanyards and SRLs
This is where trainees often have that “Ah, I get it now” moment.
You’ll learn:
- The difference between shock-absorbing lanyards and fixed-length lanyards
- How SRLs (self-retracting lifelines) reduce fall distance
- Why “fall clearance” matters more than people expect
You’ll also see firsthand how a deceleration device works and why keeping tension on the SRL is important.
Connectors and Hooks
These seem simple, but they’re not.
Training covers:
- How locking snap hooks work
- What triple-locking mechanisms do
- Why carabiner orientation matters
- What side-loading is (and why it’s dangerous)
Read related article: 29 CFR 1910 Fall Protection Training Requirement (Explained)
Anchorage Points
Choosing a proper anchor is one of the biggest skills.
You’ll learn:
- What counts as a real anchor
- What absolutely does not count (pipes, handrails, electrical conduit)
- What a 5,000-lb-rated anchor is
- How to identify safe anchorage points on different job sites
This section alone prevents countless accidents.
Read related article: When Should Fall Protection Training Take Place? 7 Situations
How to Inspect Your Equipment — The Skill That Quietly Saves Lives
You can’t use fall protection equipment without knowing how to inspect it, and this part of the training is usually more detailed than people expect.
You’ll learn to check:
- Stitching
- Webbing
- D-rings
- Buckles and hooks
- Labels
- Hardware for corrosion
- Tears, cuts, or frays
- Any signs of chemical damage
You’ll also understand why:
- If the label is unreadable, the gear is unusable
- Sharp edges are the silent destroyer of harness webbing
- Rusted hooks can fail even if they “look fine from a distance”
Many workers start inspecting their gear more seriously after this part.
Read related article: Fall Protection Training Is Provided by Employers – Don’t Pay
Fall Distance & Clearance Calculations (Explained Simply)
Don’t worry — it’s not a math class.
Trainers explain fall clearance using real-world examples:
- Your lanyard length
- The deceleration distance
- Harness stretch
- How far your body drops
- The minimum clearance needed to avoid hitting a lower level
People are often surprised that a 6-foot lanyard can actually need more than 18 feet of clearance once everything is added up.
This is one of those topics that instantly makes workers more cautious near ledges.
Hands-On Practice: Putting Everything Together
This is where confidence starts to build.
You’ll perform skills like:
- Putting on the harness correctly
- Choosing a proper anchor
- Connecting lanyards and SRLs
- Adjusting the equipment
- Approaching edges with awareness
- Climbing ladders safely
- Working on elevated platforms
- Tying off from the correct location
You’re not just reading or listening — you’re applying it.
Workers usually say this is the part that makes them feel prepared for real job tasks.
Rescue and Emergency Response: The Most Overlooked Part of Training
Fall protection training doesn’t end when someone falls. It includes what happens after.
This section covers:
- What suspension trauma is
- Why workers must not hang too long
- What a rescue plan looks like
- What the team should do if someone falls but is still alive
- Basic rescue equipment and methods
- The importance of having a plan before starting the job
Many people don’t realize rescue is required by OSHA — not optional.
A fall arrest system is only half the solution. A rescue plan is the other half.
Worker Responsibilities vs Employer Responsibilities
Training spells out clearly what each side is responsible for.
Workers are responsible for:
- Inspecting their gear
- Using equipment correctly
- Reporting damaged gear
- Following safe practices
- Staying tied off when required
Employers are responsible for:
- Providing proper equipment
- Providing training
- Enforcing safe work practices
- Maintaining equipment
- Creating rescue plans
- Supervising workers
Understanding this helps prevent confusion on the job site — and prevents arguments when OSHA shows up.
The Written Test: Surprisingly Easy If You Paid Attention
Most courses include a short written exam, and workers are often relieved after seeing it. It usually consists of multiple-choice questions about:
- Fall hazards
- Equipment
- Inspection
- OSHA rules
- Safe use practices
Trainers want workers to understand the material — not memorize it — so the test aligns closely with what was taught.
Nobody is trying to trick you.
The Practical Test: Showing You Can Use the Gear Safely
The practical evaluation is the part OSHA really cares about, because this is where you demonstrate you know how to apply what you learned.
You’ll be asked to:
- Put on the harness
- Adjust it properly
- Select an anchor point
- Connect your equipment
- Show hazard awareness
- Demonstrate proper tie-off
This part matters because it’s the difference between “knowing the information” and “being able to perform the task safely.”
Certification and Documentation: The Paperwork That Protects You
After completing both tests, you receive:
- A fall protection certificate
- A wallet card (depending on the provider)
Training providers also keep records that employers may need to show OSHA during inspections.
You’ll also learn:
- How long your training is valid
- When you need refresher training
- Why new equipment requires updated training
Your certificate is proof you’ve been trained — but your skills are what truly matter.
Why the Training Matters More Than People Realize
By the time the course ends, most people walk away saying something like:
“I didn’t realize how many mistakes I was making before this training.”
And that’s exactly the point.
Fall protection training isn’t designed to make your job harder. It’s designed to make sure you go home every day. This training gives you the ability to:
- Spot dangers instantly
- Use equipment correctly
- Protect yourself and others
- Understand what OSHA expects
- Build safer habits over time
It’s not just a class — it becomes part of how you work.
Final Thoughts: Fall Protection Training Teaches Skills That Stay With You Forever
Once you know what fall protection training consists of, the whole process becomes less intimidating and more meaningful. You’re not just checking a box or sitting through a boring presentation — you’re learning the exact skills that prevent injuries and save lives.
The more you understand about hazards, equipment, anchoring, inspection, and rescue planning, the more confidently you can work at heights. And that confidence doesn’t come from memorizing rules — it comes from understanding the real-world reasons behind them.
Fall protection training gives you that understanding. It prepares you for real job situations, helps you make smarter decisions, and ultimately keeps you safe every time your feet leave the ground.

Mike Pattenson is a construction safety trainer who loves helping workers stay safe on the job. He explains safety in a simple, practical way so crews can easily understand what to do — and why it matters.
Mike Pattenson is a construction safety trainer who loves helping workers stay safe on the job. He explains safety in a simple, practical way so crews can easily understand what to do — and why it matters.
View All Articles